

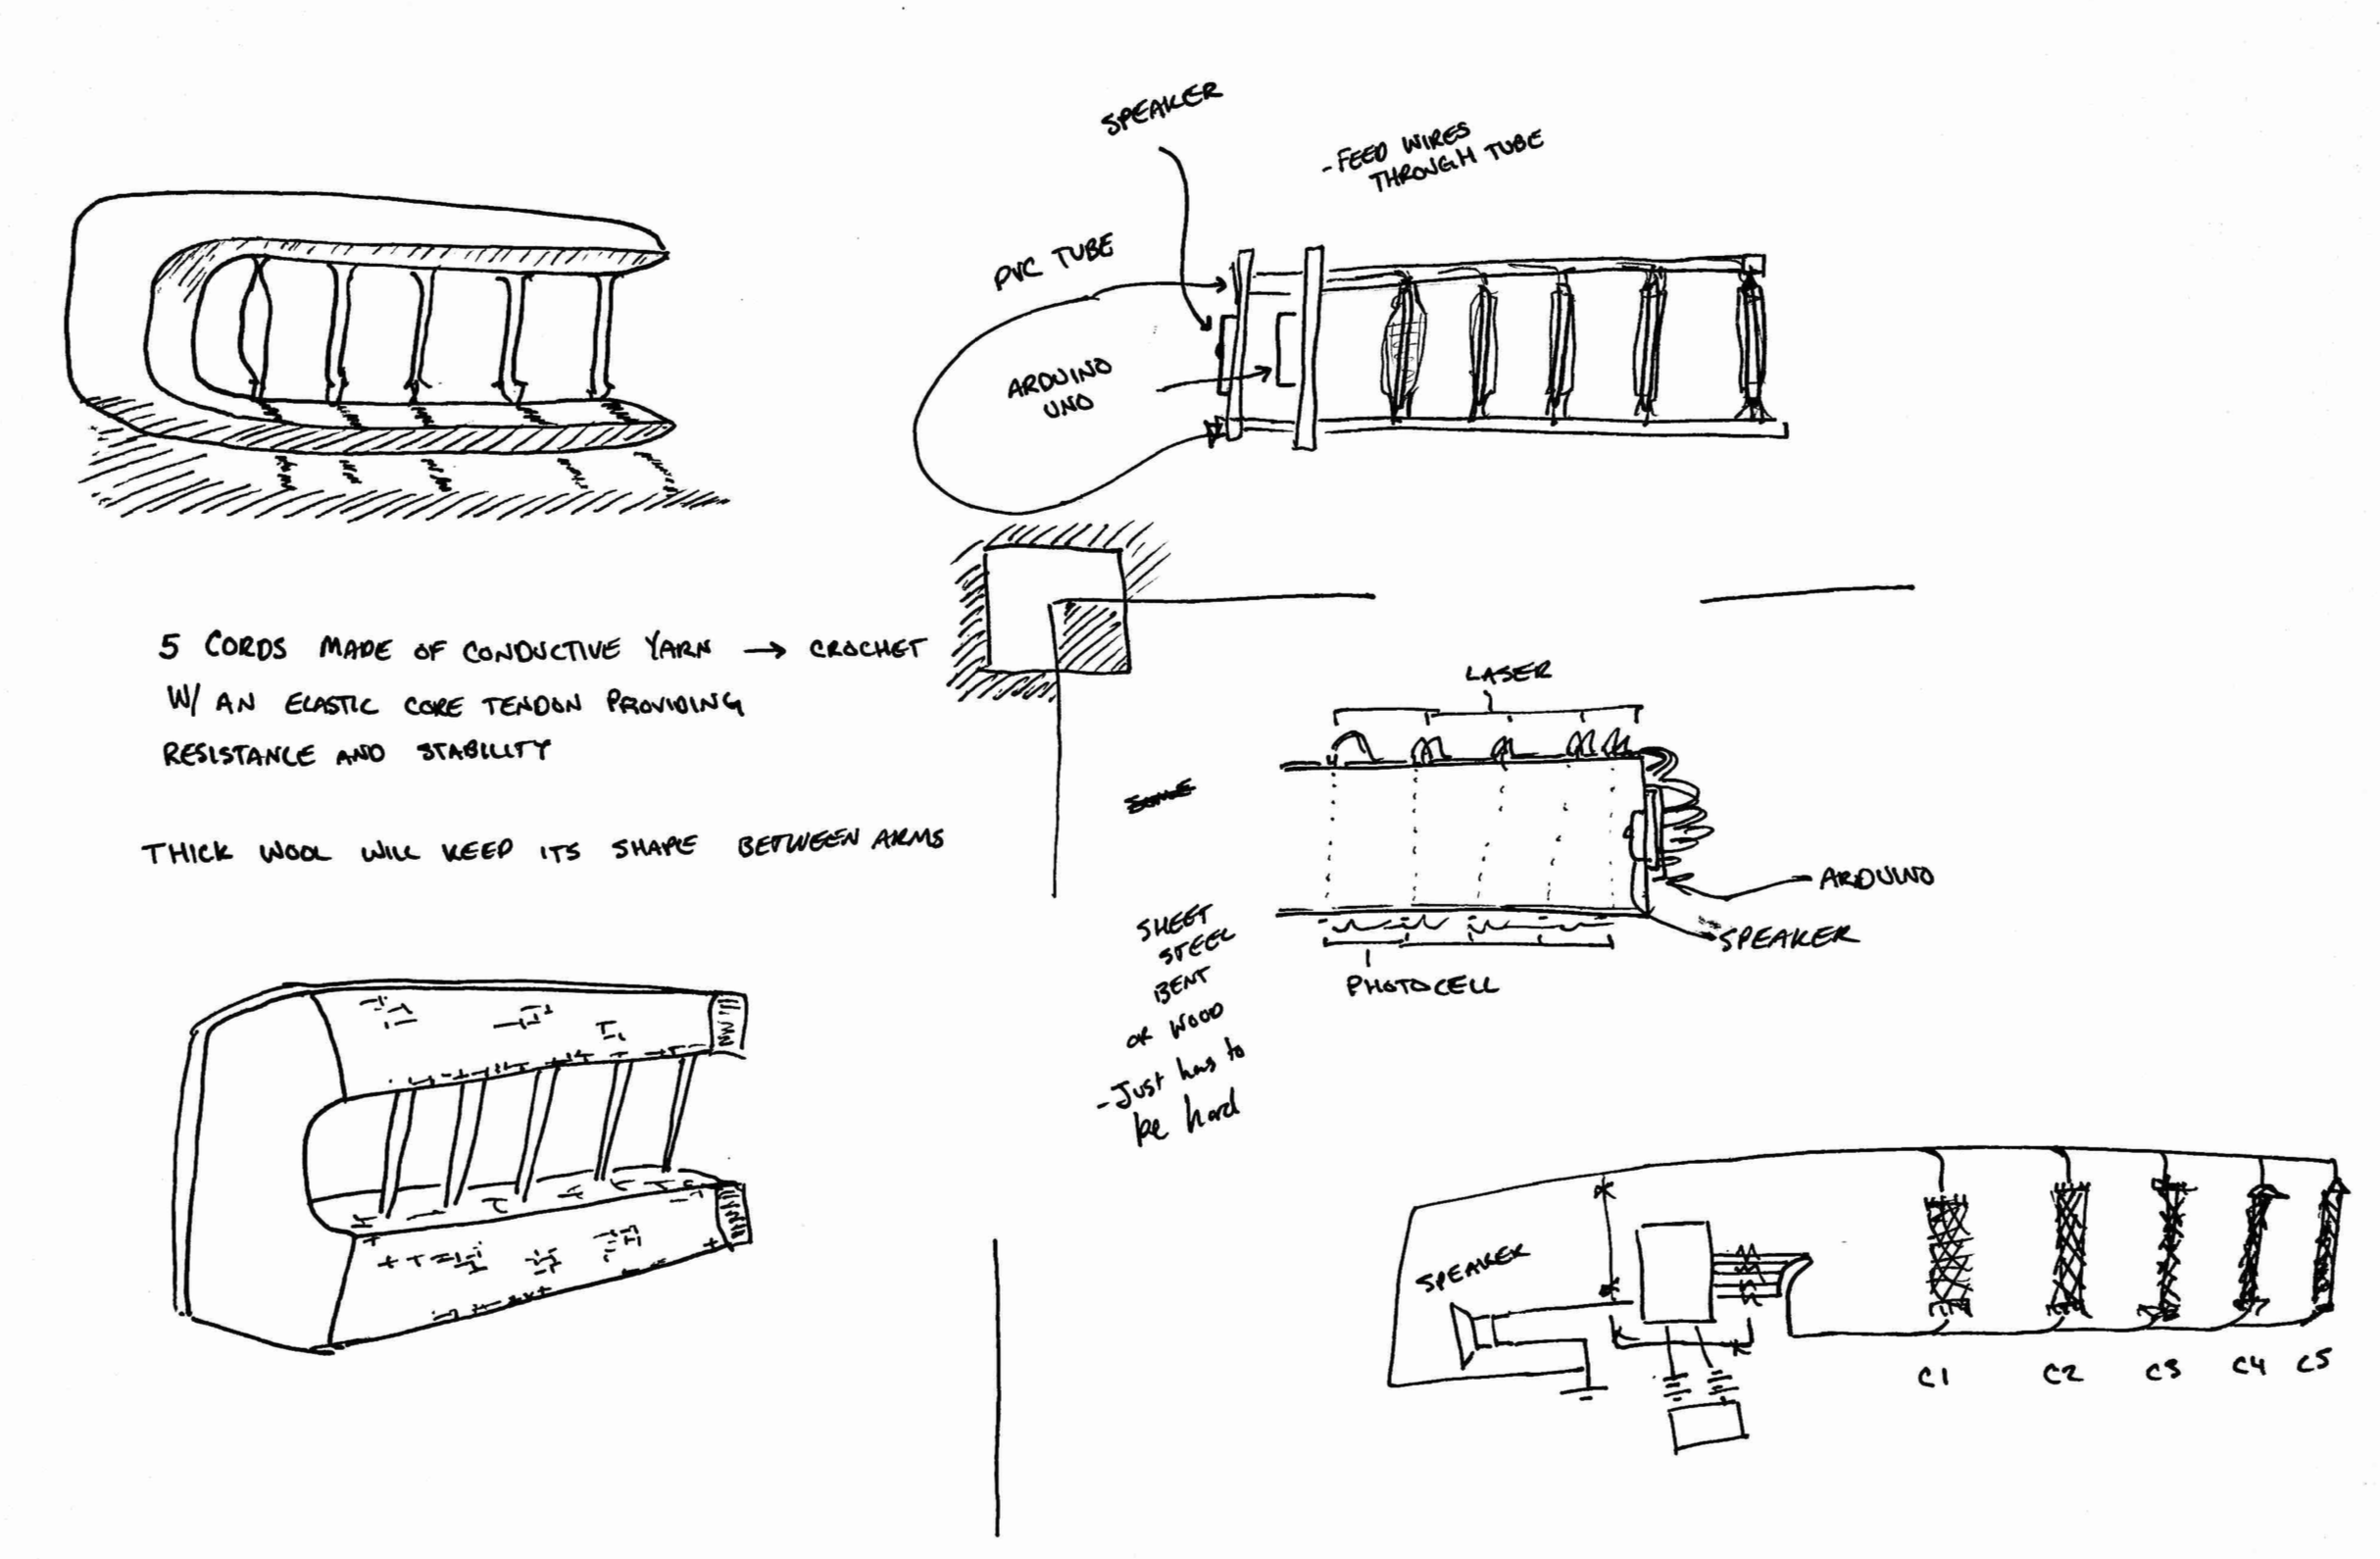
This wearable synth was inspired by the complexity of human emotions in conjunction with the comfort of human touch. Housed in a weighted sweater, the user experiences a subtle pressure on their shoulders, while the instrument is being played. Mimicking the feeling of being hugged, the user can squeeze the arms of the sweater, actuating the pressure sensors, intern synthesizing tones. With four sensors placed throughout the sleeves, the user can manipulate tones as they discover their placement. This experience emulates the interactions humans have with one another, discovering how each other can work together to create harmony and comfort.
This project began with researching how to the Ardunio Uno could synthesize sound through the use of pressure sensors. Using the Mozzi, an audio synthesis library for Arduino, I was able to modify various features of the sounds wave, allowing the sweater to be played like an instrument.
How was it done?
1. Design
2. Prototype
3. Perform!
4. Final Code
1. Design
The design of this piece through several renditions, all of which using a sweater as the main structure. Beginning with a shape similar to a lyre, the sweater was flipped, turned, and cut before settling the natural shape.


2. Prototype
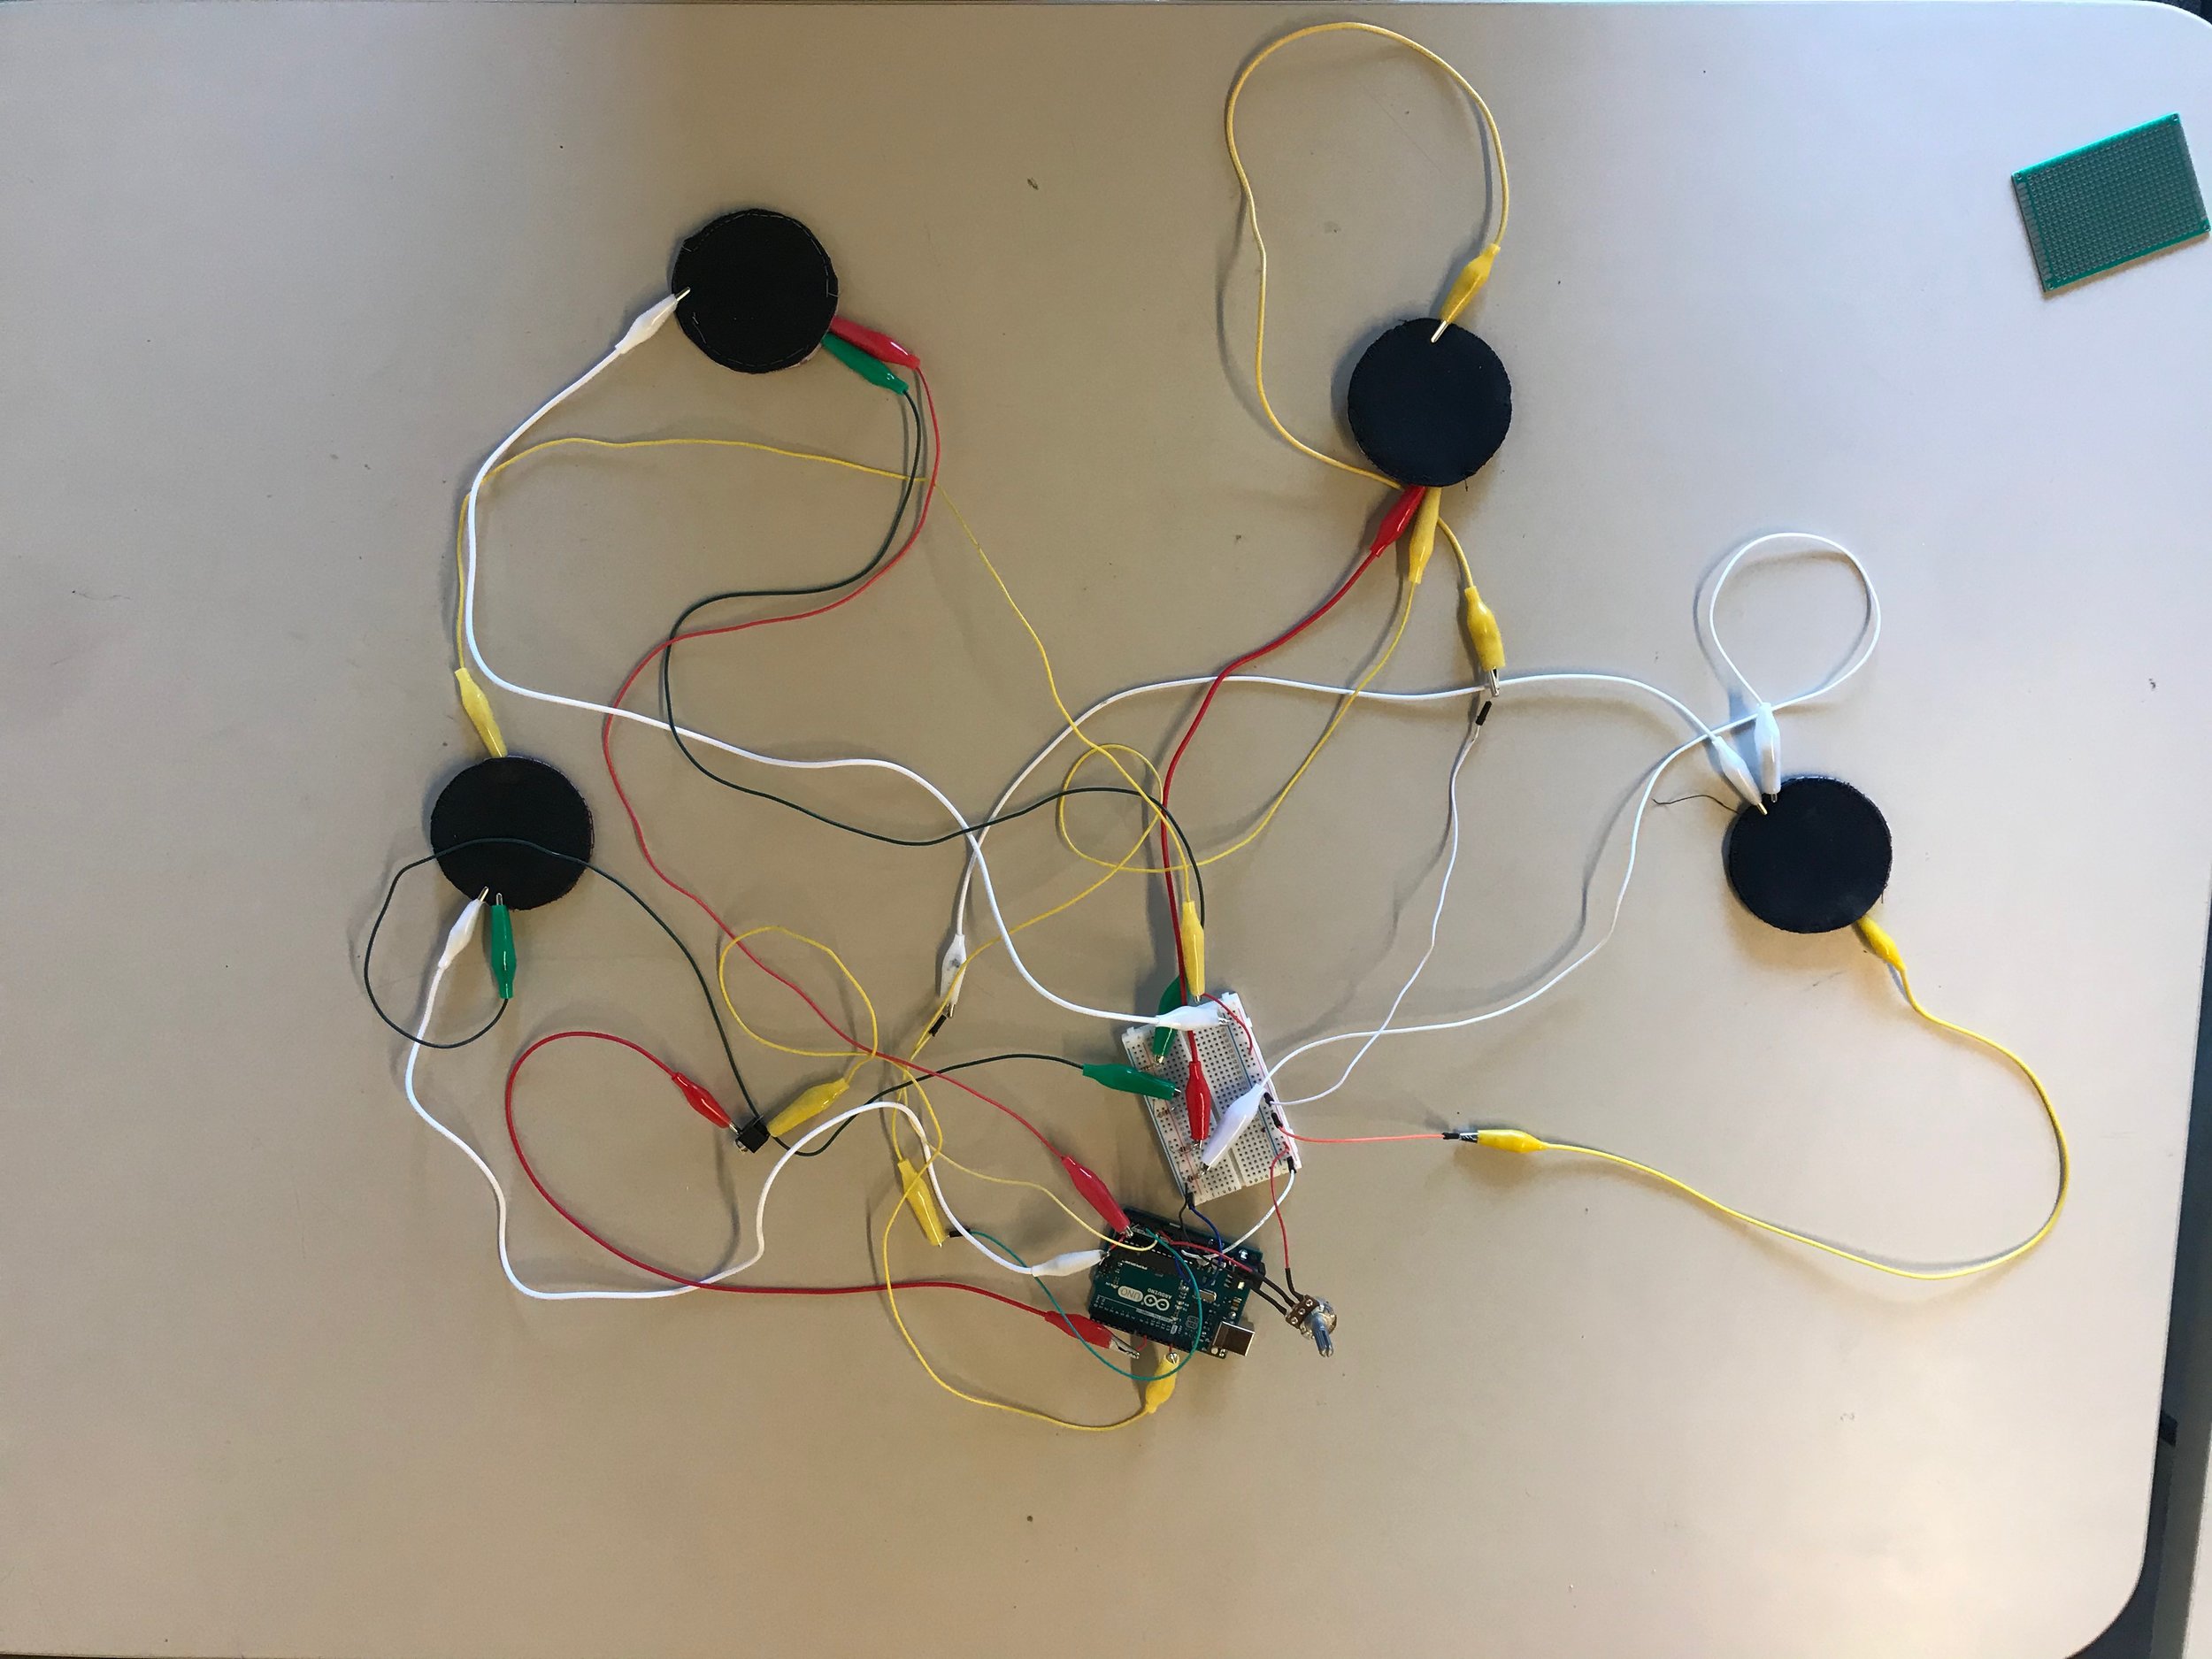
Consuming close to 75% of the time creating this project, prototyping took many forms. The purpose of prototyping is to refine the product, to understand what works and what doesn't. While it is important to proceed with the intended idea, its is also important to accept changes along the way.
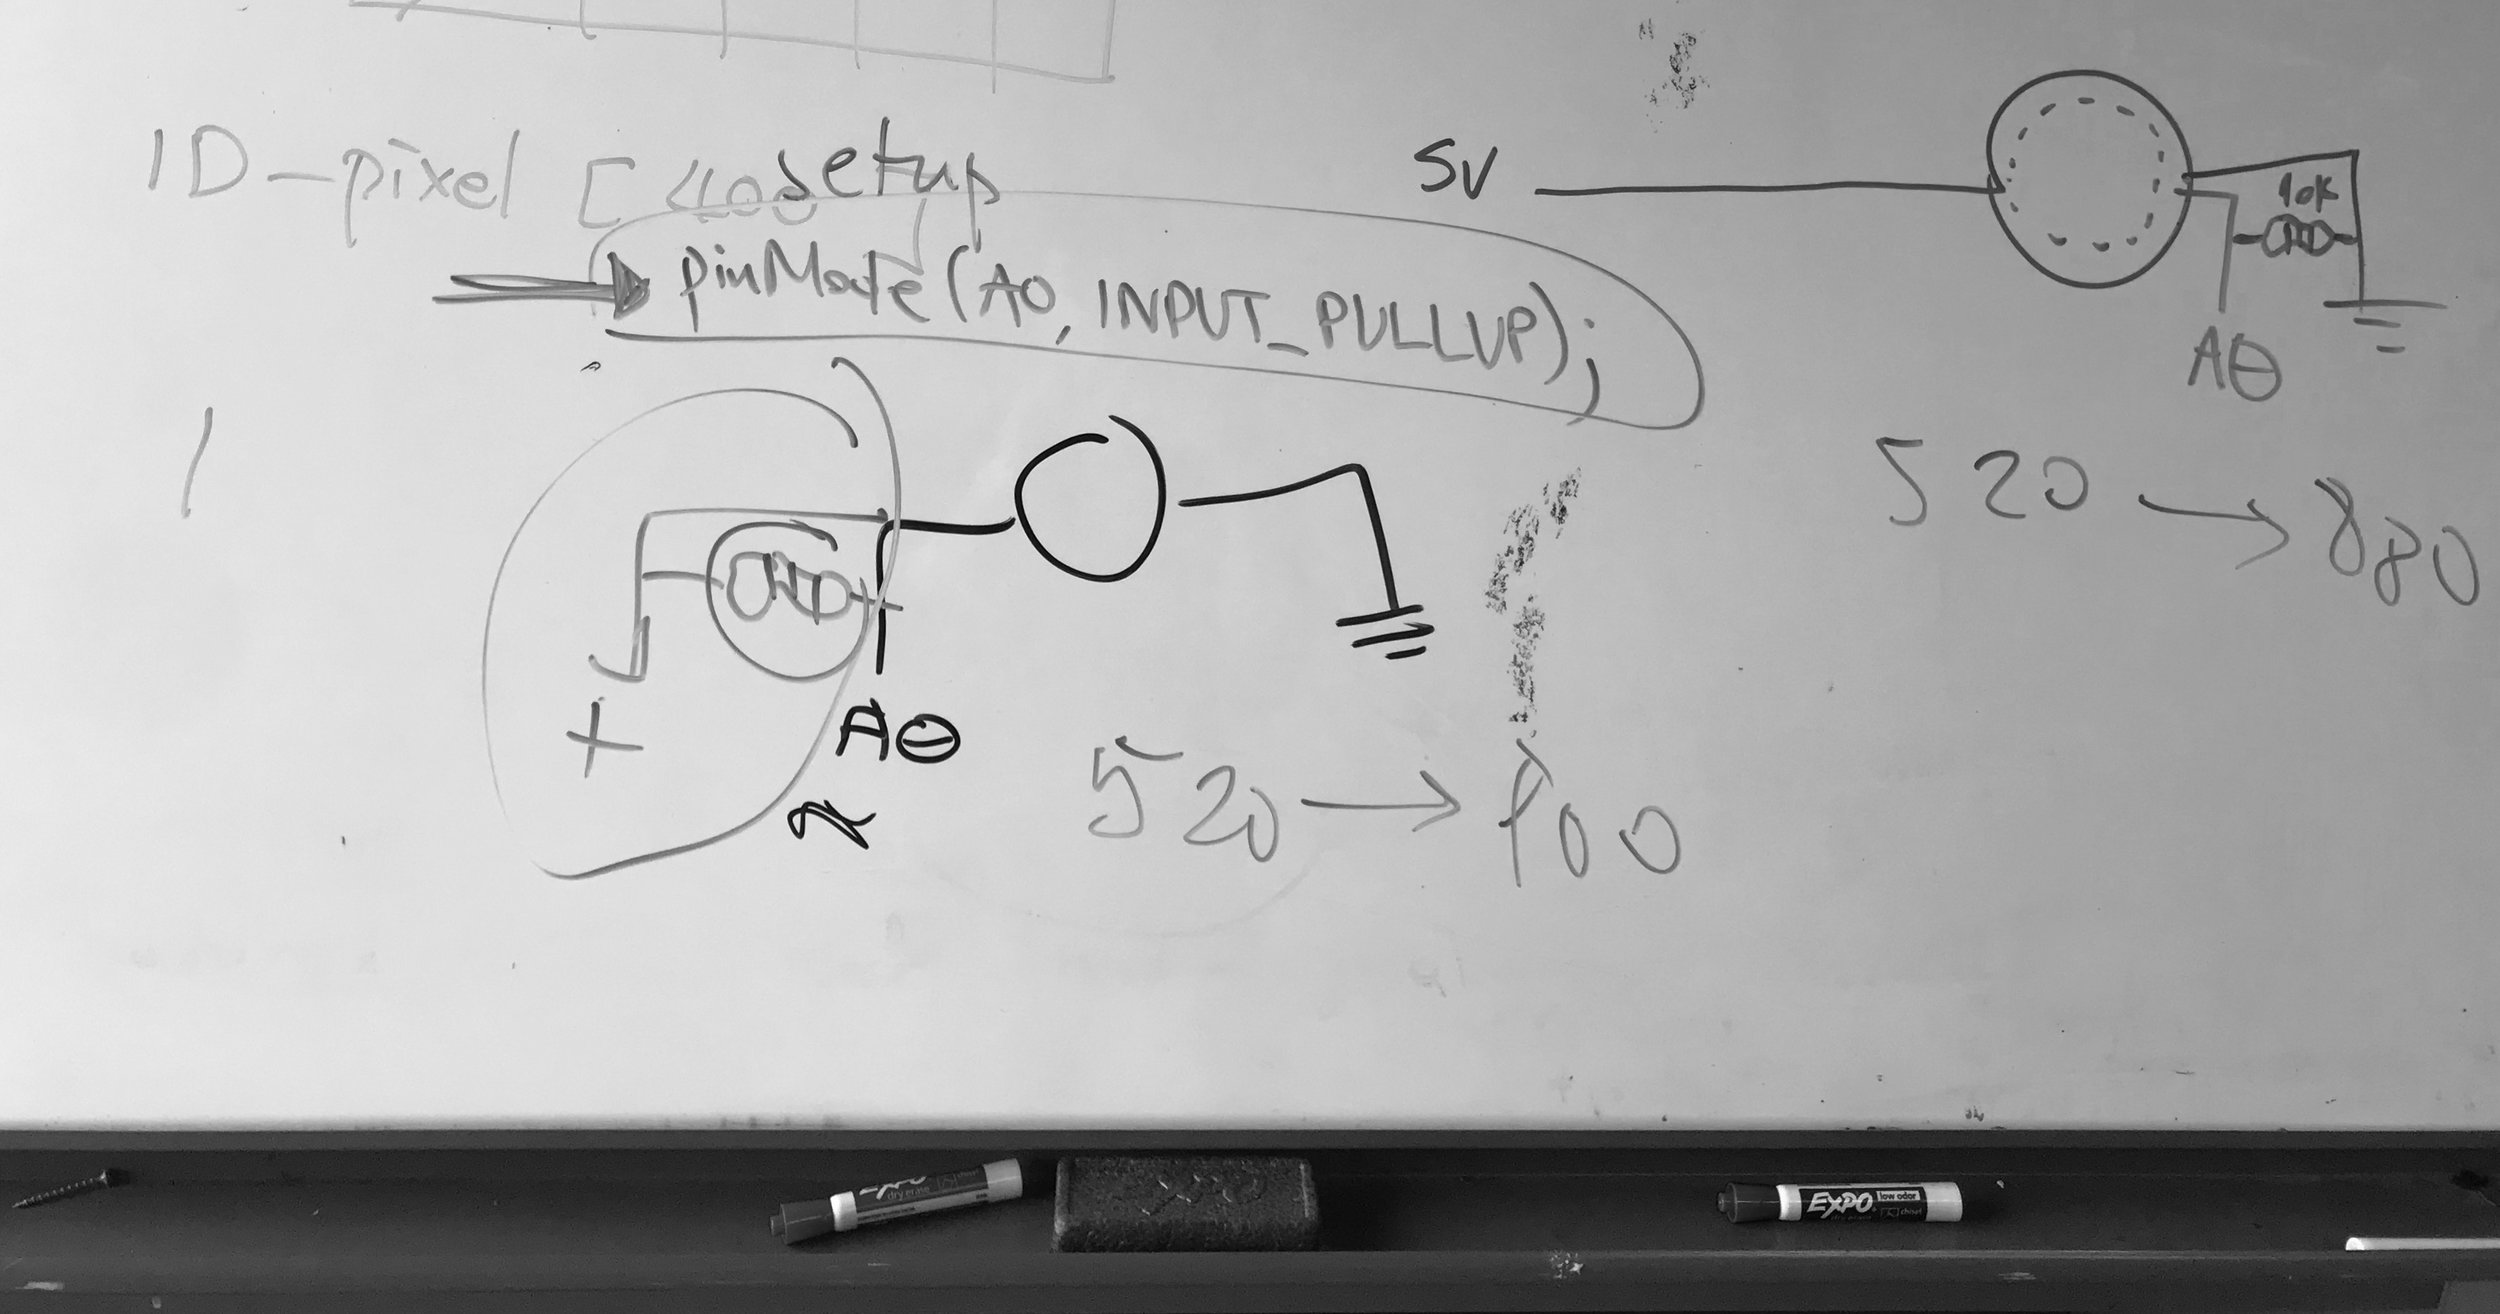
Writing and Modifying the code
Testing the feasibility of an imbedded circuit
Building pressure sensors out of E-Textile fabrics
Writing and Modifying the code
Having everything work together

3. Perform
The piece was on exhibit from June 1-2, 2018 at The Grocery, in Beacon Hill, WA.
Since it's first exposure, it has become been enjoyed with and played with by friends and strangers alike. Everyone has a different interaction with the piece the first time they use it. While some users are gentle and timid with the sweater, others can be quite rough, allowing each interaction to sound new.

4. Code
As this project progressed, it became relevant it wouldn't be possible without using open source code. Being the case, I cannot take all the credit for my code. However, hours of work went into modifying an existing code from the Mozzi library to allow the sensors to properly communicate to the Arduino Uno.
CREATE.SHARE.INSPIRE
include <MozziGuts.h>
#include <Oscil.h> // oscillator
#include <tables/cos2048_int8.h> // table for Oscils to play
#include <Smooth.h>
#include <AutoMap.h> // maps unpredictable inputs to a range
// desired carrier frequency max and min, for AutoMap
const int MIN_CARRIER_FREQ = 22;
const int MAX_CARRIER_FREQ = 440;
// desired intensity max and min, for AutoMap, note they're inverted for reverse dynamics
const int MIN_INTENSITY = 700;
const int MAX_INTENSITY = 10;
// desired mod speed max and min, for AutoMap, note they're inverted for reverse dynamics
const int MIN_MOD_SPEED = 10000;
const int MAX_MOD_SPEED = 1;
AutoMap kMapCarrierFreq(0, 1023, MIN_CARRIER_FREQ, MAX_CARRIER_FREQ);
AutoMap kMapIntensity(0, 1023, MIN_INTENSITY, MAX_INTENSITY);
AutoMap kMapModSpeed(0, 1023, MIN_MOD_SPEED, MAX_MOD_SPEED);
const int KNOB_PIN = 0; // set the input for the knob to analog pin 0
const int PS_1 = 1; // set the analog input for fm_intensity to pin 1
const int PS_2 = 2; // set the analog input for mod rate to pin 2
const int PS_3 = 3; // set the analog input for mod rate to pin 3
const int PS_4 = 4; // set the analog input for mod rate to pin 4
Oscil<COS2048_NUM_CELLS, AUDIO_RATE> aCarrier(COS2048_DATA);
Oscil<COS2048_NUM_CELLS, AUDIO_RATE> aModulator(COS2048_DATA);
Oscil<COS2048_NUM_CELLS, CONTROL_RATE> kIntensityMod(COS2048_DATA);
int mod_ratio; // brightness (harmonics)
long fm_intensity; // carries control info from updateControl to updateAudio
// smoothing for intensity to remove clicks on transitions
float smoothness = 0.95f;
Smooth <long> aSmoothIntensity(smoothness);
void setup() {
//Serial.begin(9600); // for Teensy 3.0/3.1, beware printout can cause glitches
Serial.begin(115200); // set up the Serial output so we can look at the piezo values // set up the Serial output so we can look at the light level
startMozzi(); // :))
// pinMode(PS_1, INPUT_PULLUP);
// pinMode(PS_2, INPUT_PULLUP);
// pinMode(PS_3, INPUT_PULLUP);
// pinMode(PS_4, INPUT_PULLUP);
}
void updateControl() {
// read the knob
int knob_value = mozziAnalogRead(KNOB_PIN); // value is 0-1023
Serial.print("knob_value = ");
Serial.print(knob_value);
Serial.print("\t"); // prints a tab
// map the knob to carrier frequency
int carrier_freq = kMapCarrierFreq(knob_value);
//read the value from pressure sensor 1
int ps_1_value = mozziAnalogRead(PS_1); // value is 0-
// pressure sensor 1 controls modulation ratio
int mod_ratio = map(ps_1_value, 780, 1014, 1, 8);
//calculate the modulation frequency to stay in ratio
int mod_freq = carrier_freq * mod_ratio;
// set the FM oscillator frequencies
aCarrier.setFreq(carrier_freq);
aModulator.setFreq(mod_freq);
// print the value to the Serial monitor for debugging
Serial.print("ps_1_value = ");
Serial.print(ps_1_value);
Serial.print("\t"); // prints a tab
int PS_1_calibrated = kMapIntensity(ps_1_value);
Serial.print("PS_1_calibrated = ");
Serial.print(PS_1_calibrated);
Serial.print("\t"); // prints a tab
// read the pressure dependent resistor on the speed Analog input pin
int ps_2_value = mozziAnalogRead(PS_2); // value is 0-1023
int addFreq = map(ps_2_value, 800, 1010, 100, 440);
Serial.print("ps_2_value = ");
Serial.print(ps_2_value);
Serial.print("\t"); // prints a tab
// calculate the fm_intensity
fm_intensity = (((long)PS_1_calibrated + addFreq) * (kIntensityMod.next() + 128)) >> 8; // shift back to range after 8 bit multiply
Serial.print("fm_intensity = ");
Serial.print(fm_intensity);
Serial.print("\t"); // prints a tab
// read the pressure dependent resistor on the speed Analog input pin
int ps_3_value = mozziAnalogRead(PS_3); // value is 0-1023
int multiply = map(ps_3_value, 720, 1011, 1, 5);
Serial.print("ps_3_value = ");
Serial.print(ps_3_value);
Serial.print("\t"); // prints a tab
int ps_4_value = mozziAnalogRead(PS_4);
Serial.print("ps_4_value = ");
Serial.print(ps_4_value);
Serial.print("\t"); // prints a tab
int mapModulationSpeed = map(ps_4_value, 860, 1019, 400, 1000);
// use a float here for low frequencies
float mod_speed = ((float)kMapModSpeed(ps_2_value) / mapModulationSpeed) * multiply;
// Serial.print(" mod_speed = ");
// Serial.print(mod_speed);
kIntensityMod.setFreq(mod_speed);
Serial.println(); // finally, print a carraige return for the next line of debugging info
}
int updateAudio() {
long modulation = aSmoothIntensity.next(fm_intensity) * aModulator.next();
return aCarrier.phMod(modulation);
}
void loop() {
audioHook();
}